Since the topic came up in a conversation I thought I’ll write a post about photography. I know that a lot of you don’t need any help with that, so please just ignore this post :). And I don’t consider myself a great photographer, so I am not really comfortable with calling this a tutorial. But I have learnt a lot of things from people who are far better with a camera, and I am happy to pass that on to you.
If you are looking for some advanced tips and tricks including the technical data: There are a couple of videos on the topic of doll photography on Youtube, and others in the hobby have shared their knowledge on doll forums. You can find that information, but I will stick to very simple things.
What I want to talk about today is your basic indoor photography. New dress, new doll, a quick picture. Nothing special. Just the kind of everyday pictures you want to share on social media. But you want your doll to look good.
I assume that you have either a phone or a digital camera or both and want to take nice pictures of your dolls without the need to invest in a lot of expensive equipment.
There are some things you can do to improve how a picture looks, and I will try to summarize them here. I also assume that you want to use automatic mode, either portrait or general. Try to always work without flash and use day light near a window if possible. If you need artificial light, IKEA has some affordable daylight lamps. I use Philips Tornado cool daylight bulbs for regular lamp sockets. With the phone a selfie-ring can be helpful.
Colors and background
First your doll: If your doll has dark hair and light skin, you will be able to capture more details of her face paint if you dress the doll in light colors. Placing the doll in front of a light background/surface also helps. Most cameras try to compensate for the lack of light in dark parts by overexposure. Which means: If your doll’s face is the only light thing, all the details of her face paint will vanish. Just try this by taking a picture of a dark haired doll in dark clothes, and then wrap a white tissue around her and take the “same” picture and see if it makes a difference as to how much of her face paint is visible.

If you take the trouble to brush the hair out of your doll’s face, check for lint and other possible dirt, you will save yourself some editing.
If you just want to take a picture of the head/face and your doll can hold something, placing a strip of tinfoil on her arms will help to create a bit of reflection in her eyes. A white piece of cardboard that reflects back on the face will also add some interesting effects and a more dimensional look.
Keep your cat away unless you love cat photo bombing. 😉

Just hold the white cardboard or something with reflecting surface in different angles and test how it reflects the light. For me it works best from the left side, I use some cheap white canvas from a dollar store.
I don’t want my backgrounds to overwhelm the doll’s clothes, that’s why I try to find monochrome backgrounds with a bit of structure for fashion pictures. But you can just as well use gift wrap, a photo calendar, cloth, whatever you think looks nice. The picture with the trees is crap, but you can see it’s a calendar.

Of course it’s mostly a matter of taste, but if you want the focus on your doll or new clothes, the background shouldn’t be too wild and distracting. I made the backgrounds I use frequently myself. Since I take a lot of indoor pictures of new clothes, I want a backdrop that is quickly set up, and my favorite 50 x 70 cm canvas backdrop is easy to use and store. I have bought BJD backdrops, but I hardly ever use them unless they are part of the story or idea.
And of course you can add something like a piece of furniture, a flower pot, any accessory you think would look nice without dwarfing your doll. Things to lean on can be very helpful if your doll doesn’t want to stand unaided. But “stuff” can also add some sort of balance to a picture, either a color balance or room balance. That’s why pictures of Blythe with their big heads and some sort of knee-high critter are so appealing to the eye.
The setup
The best light for indoor pictures is natural light from the front. I use my coffee table next to a large window. If you place your doll too close to the window the light will look harsh. Direct sunlight might look great to create a certain effect, but in general it’s just making your doll look overexposed. If you need additional artificial light, it’s better to work with reflected light instead of dazzling your doll with a lamp. Rule of thumb: Soft light = your doll casts a diffuse shadow on close by backdrop. Harsh light: Shadow has clearly defined shape/outlines.
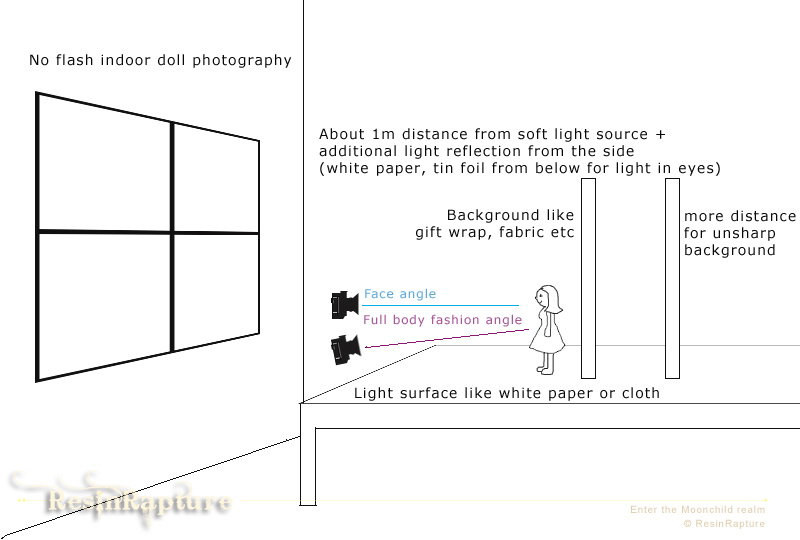
If you can arrange your setup on a table it’s not only more convenient for you, but you’ll get more light and it’s easier to take the pictures on eye level with the doll.
Instead of writing a novel, I thought an image might give you the same information a lot quicker.
The camera
I use my good old Canon EOS 1100D and either a Canon Zoom EF 28-80 mm or a prime lens for close ups. I usually don’t use a tripod, but if you want to play with shutter speed/exposure time it will save you a lot of blurry pictures.
A decent camera does help, but there are some things that will help to improve pictures taken with any camera. Try to do as much as possible with your camera, not with photoshop. Use soft light (No flash, no direct sunlight) and don’t set the ISO too high (max 200, better 100), higher will only make your pictures look grainy.
If your light is very bright and you use a digital camera, you might want to try TV mode with 1/125 shutter speed or AV mode. Just play with your settings and try everything. Don’t forget to make notes. When I started to take doll pictures and just wanted to see what happened, I used to put handwritten sticky notes with the settings in the picture. Else I would never have remembered what I used for a specific picture.
If you are using your phone and can’t switch to manual focus it’s safer to avoid outstretched hands or objects in front of your doll. Your camera might set the auto focus on the hand/object and the face will be blurry. If your phone offers portrait mode or macro, you can use that to make the background a bit more unsharp. Which might be useful if your background is just a heap of clutter.
Chosing the frame
And if you look at pictures you like, try to analyze what you like about it. The frame, the colors, the arrangement? Cropping a picture can be half of the magic. There are some guides like golden ratio, but looking at a lot of professional pictures and how the photographer chose the frame also helps. If you just post on Instagram, it might be a good idea to take the picture using Instagram aspect ratio if your phone offers that as a setting.
And that was all for now. Now it’s your turn to take lots of pictures :). Have fun!
You are absolutely the best! Thank you, thank you, thank you! I love the suggestion to take a photo with the sticky note to remember the settings. I do this with yarn labels, too.
Thank you so much for seeing a need and responding so generously.
If beaming were a thing, I’d take you to lunch, darling. XOXO
I think your pictures already look a lot better than what I come across frequently, but we are always our own harshest critics :D. I am glad you found that helpful. I have to admit that I am a total idiot when it comes to numbers. All the helpful tutorials with lots of settings… read them, forgot them. I have a software that can read camera info, but somehow I can’t remember it when don’t have it directly in the picture. Ahh- I’d love that. Who needs to fly to the moon if a lunch beamer would be so much more practical :D.
I was sitting with my camera in hand while reading your post, I changed the ISO to 400, which is the lowest possible on my camera apparently. It was set on 800, and my photos are very grainy indeed. Thanks for the many useful tips! I’m never happy with the lighting in my indoor photos, even when they are taken with help of my daylight lamps. I photoshop almost everything, but with your tips maybe I’ll have to use it less. The tinfoil is a trick that I certainly am going to try!
I never noticed your pictures are grainy, so I guess your photoshop skills are very good. 400 is still very high. I don’t know if you have dark walls or dark furniture like bookcases, but that makes such a difference! I had blue-grey walls a couple of years ago and repainted them in a light orange. You wouldn’t believe how much lighter everything looks. And using something white to put them on also adds light. I sometimes built something similar to a triptych with white canvas left and right to my background during winter. The light is most often still crap, but it helps.
Most of these tips are familiar and very useful, but to be honest Mia, sometimes I am simply too lazy or too rushed to do use them. 😒
Big hugs,
X
Thank you. Same here :), and sometimes the light just doesn’t want to play along.
Comments are closed.