Since I have been asked to write something about how I make the patterns for my doll clothes, I decided to show you how I use to go about it. I always assumed this was one of those basic techniques everyone in the hobby was familiar with – at least theoretically – and didn’t want to bore anyone. But apparently I was wrong, so here’s an explanation how to use the tape method.
It’s a bit of work but once you get the hang of it it’s really an easy way to create your own patterns. And it helps to understand other patterns if you see how a form looks flattened down and were it should go.

First a list of things you’ll need:
- masking tape and clear wrap
- scissors (large scissors to cut paper, clear wrap and cardboard and if you want to do this more often, bandage scissors or other scissors with a bent tip and straight blades)
- waterproof marker and preferably some dry pen that will write on masking tape, colored pencil e.g.
- clear sheet protectors
- paper and cardboard
- the doll you want to sew for

Undress your doll and take off the head. You might want to put the doll on a soft and even surface, your bed, a towel on the table or something similar.
Cut a piece of clear wrap that will cover the parts you want to tape up. Don’t make it too large to avoid crumpled wrap. Start to apply short stripes of tape. The curvier the part the shorter the tape before it starts to crumple. You’ll see it once you start.
When the part you want to sew for is fully covered in tape, you start to draw your pattern. I prefer using a colored pencil. Even if it’s not that visible you are not in danger of smearing marker on the uncovered parts of resin while handling the doll.
Where your seam lines go depends on what you want to sew. If you are not quite sure, try to find pictures of the garment you want to make. Where are the seams? Where are curves that need darts?
If your doll doesn’t have magnet hands and if you don’t want to bother taking the hands off, make sure your arm holes are wide enough for the hands. Especially nYID hands are at least twice as wide as the arms, and it’s very frustrating if there’s just one finger that wont go through. If you want the sleeve to become narrower you can use a slit and cuffs to create an opening wide enough for the hands.
Slits in the back for pants, skirts and shirts work best if you start them at the widest point of the butt or below the shoulder blades. Sleeves don’t crumple as much in the arm pit if you design them to fit at a downwards angle of 45° instead of a square angle. I usually don’t tape the arms, just follow the curve of the armhole and draw a middle line from the top in arm length to create a sleeve pattern.
I usually start with a line exactly in the middle. That way I can use the same wrap for two different patterns. Just mirror the pieces along the middle line afterwards.
Now comes the fiddly part of cutting the wrap. I have some bent tip scissors that are extremely useful. They are dissecting scissors, but similar scissors can be found for bandage cutting, paper art or embroidery. Nail scissors with a curved tip are kind of annoying because they cut in curves, but you can use those as well. Just make sure you don’t scratch your doll.

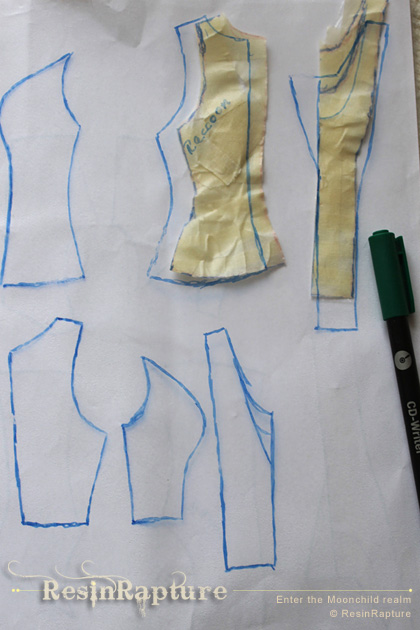
I use to start cutting along the middle line. It’s usually enough to pull the tape-shirt or pant leg off. If you have a lot of small pieces to cut, you might want to mark them with numbers to avoid confusion.
Once I have my pieces I flatten them and put them in a clear sheet cover to trace the outlines of the piece on the clear sheet. I use CD-marker for this. The lines still don’t look as neat and proper as I like them at this stage, and that’s why I use to trace them once again on paper. If the lines don’t shine through the paper you can tape them to a window or use transparent paper.
When I have drawn my paper pattern, I write the doll model and part on each part of the pattern. If you sew a lot for a lot of different dolls you might want to do this to avoid mixing them up.
When I have a neat pattern on paper I make a copy of it and cut the pieces to glue them on cardboard. The cardboard pattern is my stencil I place on the fabric and trace the outlines with kid’s felt pen. They are usually easy to wash out. I use to add seam allowance while cutting, how much depends on the kind of fabric I want to use. My cardboard pattern pieces and the master paper pattern they’re made from are stored in the same sheet protector and I can just file them like this.
I hope this was helpful. If you have any questions regarding the process, just ask in the comments.
Have fun sewing!
Some of your terminology is unfamiliar to me. What is "edding"? Also, what do you mean by CD-writer? People use this term to describe a computer software program for burning discs. Or do you mean a pen designed for writing on CDs?
My past attempts at creating patterns using this method have been frustrating. Maybe it's because I followed instructions that didn't mention cutting the tape into small pieces. I ended up with sections that I couldn't flatten sufficiently to create usable pattern pieces. Next time I'll try it your way.
Edding is a waterproof marker, same as CD-writer. It's what is written on the pens, so I didn't think of the terminologiy. Sorry if that was confusing. :). I just cut the pieces like I would cut the fabric, but I think you don't need any pattern making tutorials ;).
Oh, I absolutely need pattern tutorials! Once I have a pattern I can vary it, but I need the basic shape worked out for me before I can do that. My mind can't translate from round to flat. That's why I enjoy crochet so much–I can create in the round and not worry about how it will look flattened out.
Waterproof marker. That would not have occurred to me based on what you had written. (I see you've changed it. Thank you!)
I looked it up, apparently it's a brand name that is used instead of the proper name over here. It's sharpie in the US I believe. But anyway, glad I could clarify this :). Translating from round to flat is much easier once you start using the tape method, just because you see how the form changes. All a matter of practise 😀
I use this method for some types of patterns, but you explained it really, really well! And oh my, those scissors! I might need them, I always struggle with cutting the pattern and taking the thing out of the doll D:
Comments are closed.