My FIDs, Raccoons and other MSD sized dolls need some more furniture. Most of the furniture I made is in 1/3 scale, and since I have quite a bit of wood left I decided to build a porch bench.
And I will try to provide a guide how to do this. I won’t provide detailed instructions for every step, because I don’t now what sizes of dowels for model making are available where you live. Exact measurements don’t really make sense in this case, you need to do the math yourself.
What should be roughly the same are the basic measurements of heights and depth of the seat – if you want to build a bench in MSD scale, that is. I made my bench for my FID and Raccoon dolls, I wanted a bench with enough space for two dolls, but small enough to store it in one of my prop-boxes.
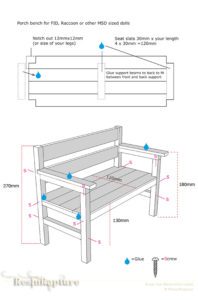
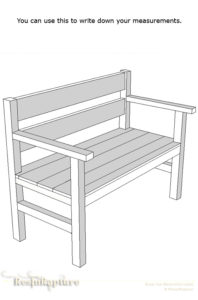
But your dolls might require other dimensions. If you place them somewhere in a sitting position you can measure the heights you need and adjust them accordingly. The last picture in this post is a picture of a blank drawing you can use to write down your own measurements. Below are my measurements in inch to give you an idea of the dimensions if you can’t ‘think’ in metric measurements.
270 mm=10.62 inch, 180 mm = 7.08 inch, 120 mm=4.72 inch, 130 mm=5.11 inch
I used spruce dowels for model making, they are available at my local hardware store. They are already sanded and usually about 120 cm long. My finished bench looks slightly different from the one in my original drawing, I changed my mind about how I wanted the back rest to look after I made the drawing. Don’t let that irritate you, I figure you’ll come up with your own design anyway.
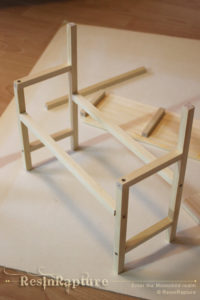
What you will need is a saw, small screws, drill, glue and of course a screw driver, something to measure and a bit of math (I hate that part). I prefer screws over glue, and I use to pre-drill the holes. If you pre-drill the legs to attach the horizontal support beams, you need to measure half of your dowel’s dimensions down from the mark you made for the height. To put the screw exactly in the middle of the horizontal beam you can use a little cardboard square with a hole in the middle for marking to make it easier.
More maths: If your desired depth of the seat is 12 cm and the legs are 1×1 cm, your horizontal support side beams need to be 12-2=10 cm.
It’s easier if you plan this before you start cutting and write the measurements down.
I used dowels with the following measurements:
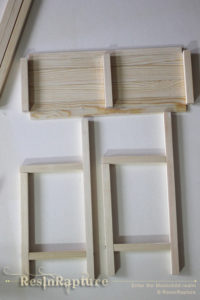
12 mmx12 mm for the legs, 30 mm x 5 mm for the slats and 9 mm x 9 mm for the rails. If you want to make a simple bench you just need two sizes: the dowels for the legs and support beams and the slats for the seat. I decided to attach the slats without gaps, they are easier to paint that way. My bench is 30 cm wide and the seat is 12 cm deep (11 cm for the seat + 1 cm below the back rest).
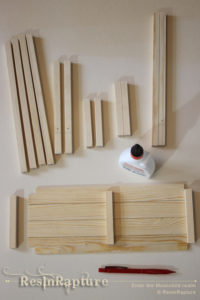
I cut
- 2 back legs (27 cm)
- 2 front legs (18 cm)
- 4 horizontal beams front and back (30 cm – 2×12 mm = 27,6 cm), two of them for my version of back rest, if you want to glue a slat or two to the back legs as back rest you only need two for the seat.
- 5 side support beams, 3 of them glued to the back of the seat slats (12 cm – 2×12 mm = 96 mm)
The slats are 30 mm x 30 cm, with notched out squares of 12 mm x 12 mm for the legs
What is still missing in this list are the slats for the back rest or cuts for your version.
I changed my mind about the design of the back rest after this stage and took it apart again to pre-drill holes for the back rest. You might want to do this before ;).
I covered the screw in the front leg with the arm rests, these are 120 mm x 20 mm with a notch for the leg.
Now I just need to glue one last beam between seat and back rest, but I need to buy another dowel for that first. I managed to break the last one.
Dowel bought, attached and some final sanding here and there. Now it just needs some paint.
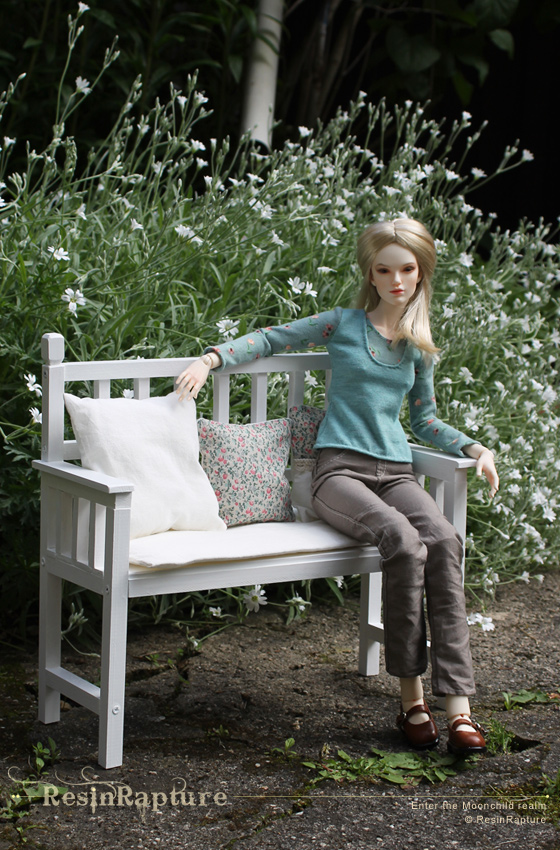
And this is how the bench looks like with dolls. The first shows the bench with one of my Raccoons. Since these two have smaller heads than regular MSD sized dolls I added a picture with my MYou Twins, the proportions look slightly different if the doll’s heads are larger, even though the body is about the same size.
The picture below is the blank drawing you can print out and use to write your measurements down in case you want to give it a try.
And you know what? Now that I have a bench I need to build a porch diorama. Oh my….
I would love to see your results, leave me a comment if you post a picture somewhere please 🙂



Nice bench Mia! I really like your finished one, it has a lot more style. Thanks for the inspiration and the tutorial. Isn't it funny how one piece of furniture can lead to a whole new diorama?? To be honest with you I have so many on the go right now, this bench will have to wait in line. 🙂
Big hugs,
X
Thank you! I am sure you don't need tutorials. And you are right, I am already busy building a diorama. If only I had a room just to store them all.
You have flat-sided dowels! The only dowels I've ever seen are round–more like logs with the bark removed–which give a totally different look to this bench. I must admit, the minute I see mathematical calculations my brain shuts down so I may never build one, but I love seeing how you made yours. And I love how your bench looks.
The round ones are more common. But the hardware store just 5 minutes from my place carries the square ones as well. Lucky me :). I do hate the calculations part, but that's where the calculator on my phone comes in handy. Thank you :). I am quite happy with how it turned out.
I must congratulate you, this bench looks terrific! It looks so realistic, and I loved it on the last two pictures. You are really skilled, congrats!
Thank you :). Now I just need a miniature garden….
I'm so happy I found your blog! 🙂
This tutorial is so great, thank you for sharing. And all your dolls are amazing.
Oh thank you! I am happy you like it and I hope you have fun building your own bench 🙂
Comments are closed.