I’ve been busy 🙂 The kitchen is almost de-pinked, and while the paint dried I started with lots of other stuff. Plastic is not the greatest material to paint. I disassembled the whole thing first, then sanded the larger parts. I used silver spray to cover the pink and as a base for the white I want to use.

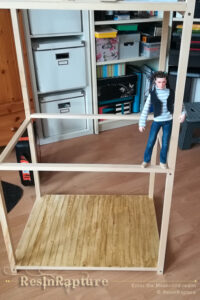
Did I mention I wanted to pile the rooms on top of each other? Well… Here’s a start. I want to build this in a way that will allow me to take out the floor in the middle. Whatever room goes on the ground floor, I need light to take pictures, and taking out the story above will certainly add some light.
And I will leave one side open. I am not sure yet which diorama will go on what floor. One will be the kitchen and one will be a rebuild version of my existing shared tiny house diorama. I want to use the top shelf for a bedroom/bathroom combination, both just half the size of the other rooms.
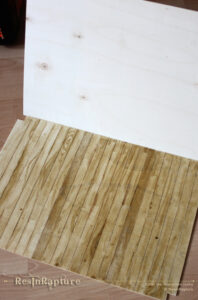
I have bought a pack of DIN A 2 (420 x 594mm) poplar-plywood. It’s great for projects like this, almost soft enough to cut it with a cutter and still sturdy enough to support the weight of doll furniture. It’s a bout 4mm thick. I wanted a wooden plank flooring look for this tiny house. I carved 2cm wide floor boards into the plywood first. I used a metal knitting needle for this. After carving the planks I used wood glaze to paint the grain, because I wanted them to look like individual floor boards.
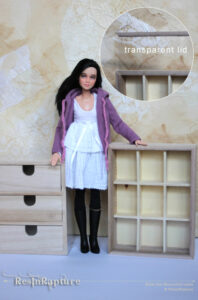
I bought some stuff as well. One of my favorite shops to buy miniature food on Aliexpress is Micro-world store, I already found the tiny waffle maker there, and ordered some more food and a coffee maker. But it will take a while to arrive, Chinese New Year holiday is just over, and they are not yet shipped. Another favorite shop is called VBS-hobby, it’s a German language shop selling all sorts of hobby stuff. I found some tiny furniture (or rather plain wood storage boxes and a tiny set of drawers). They are the perfect size for Barbie. The tiny storage box has a transparent lid, so I will be able to use it as a storage box when it’s not a book case.

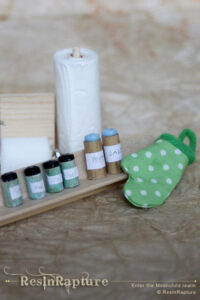
And I made a couple of miniatures. This is so much fun! I will have to make more. The tiny spice jars are just pieces of a chopstick, with a button glued on top. I made the tiny oven mitten. The black plant pot is part of a nail polish bottle cap. And I made tiny rolls of toilet paper. I found a Barbie toilet on thingyverse. A friend will print it for me, and I am really curious how it will look.
This is the progress I made since I wrote the last post. I hope I’ll be able to finish the kitchen within the next week – the paint job, that is. It will take a while until I have finished the complete rooms.


That’s a lot! 🙂 I love the miniatures you made.
I’m very curious how the pile of dioramas will look in the end.
I’m going to make the floor for you-know-what the same way. xD
Thank you! Me too, I want to have more time- and daylight to work on it. Haha. You know what secret floor making :). I made two, and gave one a very water-diluted white top coat, now it looks very shabby chic. Or like and old kitchen floor that has been white washed years ago. I am curious to see how your’s will look.
You just gave me an idea… With the diluted white…
That’s so great about this hobby – exchanging ideas 🙂
Oh my, I love the miniatures, but the toilet paper made me laugh! It looks *so on point*! Also, the idea of piling up rooms is great. I can’t wait to see what you do!
Thank you! I can’t wait to see how the toilet will look my friend is printing for me 🙂
De-pinking Barbie size stuff is always a good thing ;D OMG, that toilet paper and kitchen paper is so awesome! And the little oven mitten!! Love all this! Your 1/6 scale rooms will look so great!
Thank you. I would love to have more time… I want to work on the rooms!
Comments are closed.