If you found this via Pinterest or visit for the first time: Don’t forget to subscribe to the blog if you want to use it. Subscribers get notified of new patterns via email. And of course you can just follow ResinRapture on Facebook. Thank you!
Note: Since a lot of patterns require the same basic techniques, I am not going to walk you through every step. I don’t want to insult your sewing skills. But in case you are unsure how to go about it: Here is a short guide with some tricks and tips. I hope it helps to understand why I do certain things and how.
So here it is:
Pattern and tutorial for a coat / jacket
The pattern is made to fit the Pure Neemo S body.
Make sure you print the PDF without automatic scaling.
Letter / DIN A4 PDF
Don’t forget to subscribe to the blog if you want to use it
![]()
![]()
Cut out your pattern pieces and glue them to cardboard. Read through the tutorial first, I do some things like attaching sleeves a bit differently, and if you are used to your workflow, you might want to change the order accordingly. You need to add seam allowance to all pieces, except to the edge of the front panels (B in the pattern drawing).
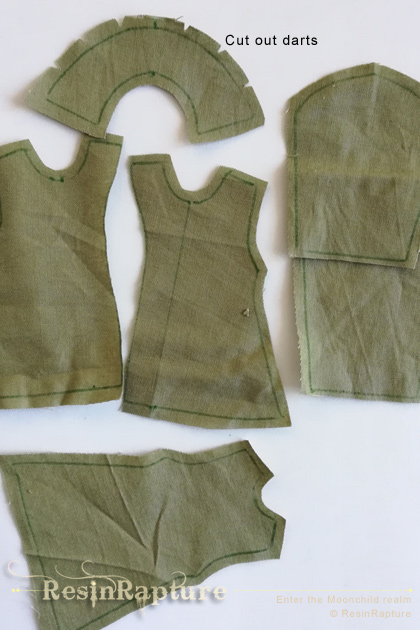
The first thing I usually do is run a small zigzag along all pieces and mark middles. I sew a lot of very tiny stuff by hand, and you will need to sew at least some of the pieces by hand as well. If you want to use fabric that doesn’t fray you can skip this step of course. Before you zigzag the collar, cut tiny darts into the sewing allowance above the upper curve (see picture), else your fabric will crumple if you fold it down. If you want to use iron-on interfacing instead of a hem you can skip the zigzag.

Fold the front panel back (except panel left side face down) and mark 5 mm at the top. Sew along the pattern line. Same at the bottom hem of the panel, full length of the fold. Turn the edges inside out (1) and use a strip of cardboard to make the edges as neat as possible. Press the fold. Pin both front panels to the back part (2). Make sure your pieces are on the correct side.

Sew side seams and shoulder seams, but don’t include the shoulder part of the front panel. (3)
Since this is such a small jacket, we don’t want too much bulk and go for a one-layer collar. Make the collar hem. It’s a lot easier to make a neatly rounded fold if you take your pattern piece, hold it on the fabric and press the fabric carefully down along the curve of the cardboard. While your iron is still hot, use it to flatten the side seams. I chose a tiny rolled hem for the collar, but of course you can just stitch the fold down.

Take your collar and your body piece, both right side up, and pin the collar with the seam on the inside to the middle of your neckline (4 in the third picture). You might want to baste this down. As you can see, the ends of your collar end at the part where you have created your panel edge. We want to sew the collar to the neckline in a way that both ends fit into your little corners. I would baste it to the back and sew from the inside, where you can see your pattern line.

Once you have done this, you fold the collar up. You will already see where this is going. Baste the fold or press it. You still have those two loose “flaps” from your front panel. Create a tiny fold that will cover the stitches of your freshly attached collar. I would baste this before I actually stitch the fold down. Turn the parts or put them on the doll in between steps to make sure everything aligns neatly and you have a smoothly curving “fake lining”. That’s one of the reasons why I always put the sleeves in last, it’s just so much easier to do a fit check without sleeves. As for the lining: Whether you chose to use a hidden stitch like I did or just a top stitch: make sure you grab just enough fabric to attach the lining, not poke all the way through. It should be invisible from the outside of your coat.

After this fiddly part the rest is cake ;). Attach the sleeves. Fold back the cuff and add a topstitch. You will already have noticed that your panel fold at the bottom created the start of your bottom hem fold. Fold it back, press it and stitch it down. Pressing seams is generally a good idea, and if you have zigzagged all your parts you can part and fold your sewing allowance to either side of your seam. That way you have a lot less bulk. Now all you need to do is add snap buttons/buttons to the panel and fold the collar halfway down again. And if you have used kid’s felt pen to draw your pattern lines (like I did to make them more visible in the pictures), washing would probably be a good idea ;).
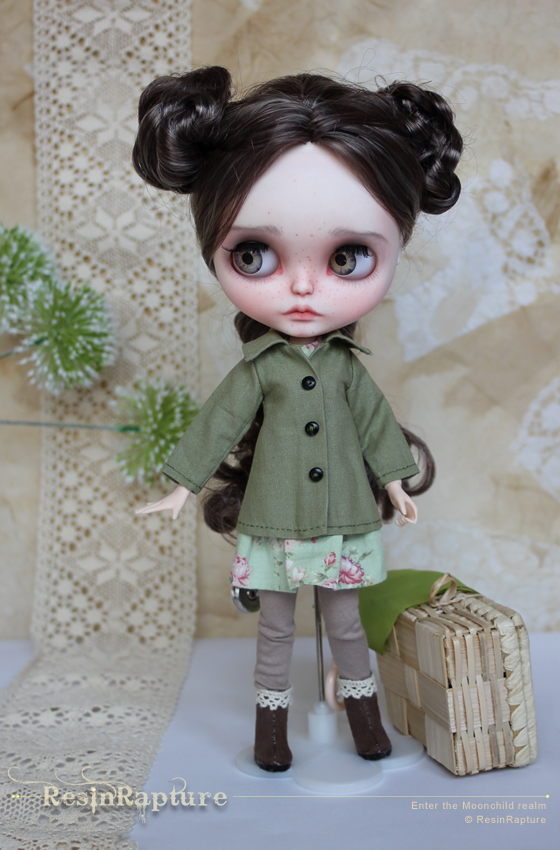
And just to reward yourself after this fiddly job with something nice and easy next time: The next pattern will be the ultimate all-in-one dress pattern ;). If you like the dress she’s wearing: You’ll get the pattern for it in a little while. Some of the sample dresses are not finished yet. And since I just got the news that I can re-open my shop after almost five months of lockdown, I have to concentrate on my business for a change.
This is how it looks.


How about matching eyes for your new clothes? Check out ResinRapture free eye template sheets!
I hope this was fun and one of your dolls will have a cute coat soon :). Don’t forget to subscribe to get notified of new posts via email. You can find all patterns I share in the sewing section of the blog.
And maybe you’d like to join the Facebook group I created recently to show how it turned out?
Tag @resinrapture on your Instagram or join the sewing and creating Facebook group OneSixBackstage to show your work!
I very much hope the group will grow into a nice community of creative doll owners. Sales-free and for all those of you who sew and create for Blythe, Pullip, Momoko, Kurhn or other 1/6 scale fashion dolls. A lot of them can share clothes and the same patterns work for a lot of different dolls. Let’s figure it out together!
Here is the link to the Blythe&co sewing and creating group “OneSixBackstage” on Facebook.
She looks lovely!! I really like the whole outfit <3
Thank you so much for sharing!
Thank you! Would they fit Kanon?
A lovely little coat! Such pieces are too small for me, but people who are used to sewing small garments will love to try this! It’s very generous of you to share your patterns and tutorials. 🙂
Thank you! I wouldn’t want to work in that scale every day either. I have learnt so much from people who shared their knowledge that I think it’s only fair to give something back.
I’m definitely going to try this coat pattern soon. Thank you for making it free for us.
:). I look forward to see your coat!
Comments are closed.