A new girl in the house means new outfits. Coco wanted a bib overall, so I drafted a pattern and started sewing for her. She’s happy :).
And since it’s a fairly quick and simple outfit I thought I’d share the pattern.
If you found this via Pinterest or visit for the first time:
Don’t forget to subscribe to the blog if you want to use it. Subscribers get notified of new patterns via email. And of course you can just follow ResinRapture on Facebook. Thank you!
So here it is:
Pattern and tutorial for a simple overall with a bib, a shirt and a matching hair band.
The pattern is made to fit the Pure Neemo S body, but you can use it for similar sizes like Kruseling girls or Kurhn as well.
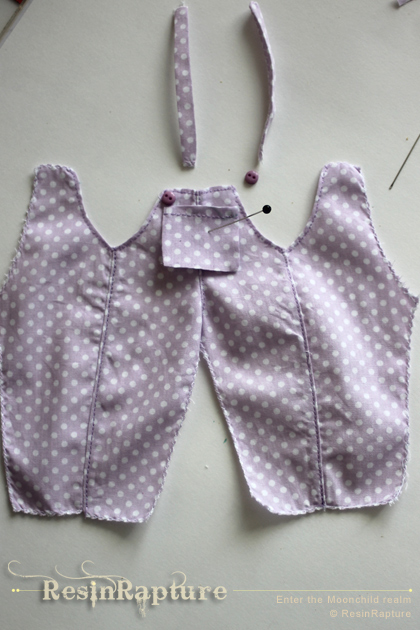
I used a combination of berry colored jersey and light lavender cotton with dots for Coco. This is how it looks.


Tutorial
Bib overall
How to print the pattern: Place it in a document that allows picture scaling (e.g. Word). Scale proportionally to 19 cm (7.48 inch) width. If you want to use the pattern for a Kruseling doll, you might want to make the sleeves about 8 mm shorter. A Kurhn or similar sized fashion doll will need a bit added length in the legs. I recommend making a quick mock up to see if you need to reduce the pants pattern piece width. The included sewing allowance is quite generous. Or you can just use the PDF. Make sure you print them without automatic scaling.
Letter / DIN A4 PDF
Don’t forget to subscribe to the blog if you want to use it!
![]()
![]()
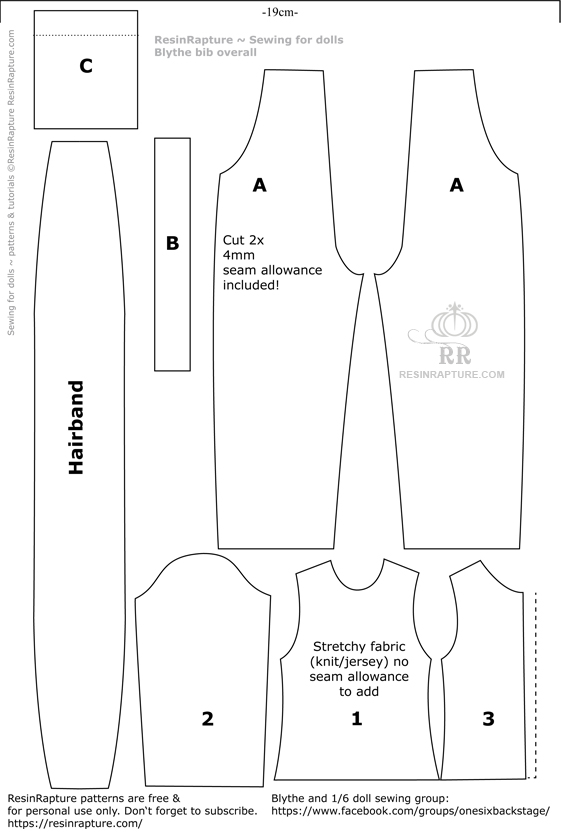
- Overall (A) pattern pieces have 4mm seam allowance already included. If you usually don’t need that much, cut your pieces a bit less wide.
- Shoulder straps (B) and optional pocket (C) have no seam allowance included, you will need to add what you need depending on how much you want to fold back.
- The hairband includes enough seam allowance for a 1 mm double folded hem. Add more if you want to zigzag the edges, fold them and add a top stitch.
- The shirt pattern pieces (1,2 & 3) do NOT include seam allowance. If you work with knit/ jersey you won’t need it. I usually just cut 2 of the body part (1), and cut the neckline deeper. You can pull it up over the bum and don’t need to bother with a closure in the back.
How to sew the overall
I usually run a small zigzag along all pattern pieces first. That way I prevent fraying while I handle the pieces and can decide later what to do by hand/machine.
Start with sewing the crotch seam, followed by the side seams. Add a top stich if you want one. Fold back the seam along the arm holes and the front bib and add a top stitch.
If you want to add a pocket or any kind of embellishment to the bib, now would be the time to do that. Keep in mind that you will need a bit of space for the buttons, so don’t place your pocket too high. Since I didn’t want too much bulk in the front, I decided to attach the snap buttons for the straps in the back. I attached the shoulder straps and buttons in one go to the front.

Next the inner leg seams. Make sure you align the leg parts from the bottom hem up, there needs to be a bit of overlap for the sewing allowance of the back seam in the crotch. Now sew the back seam. After closing the back I attached the pointy part of the snap button to the back bib. I prefer crossing straps, they don’t slide down the arms as easily. To mark where the counter part of the snaps should go I simply put the overall on the doll and pressed the button down into the fabric to make a little mark. Attach the snaps and cut off/hem the end of the straps.
Almost done. I used a double folded blind hem on the leg bottoms and turned the hem back up. Of course you can fold it up as it is, but I think it just looks nicer if you can’t see the hem on the left side. In the variation below I used some trim instead of a pocket and added the same trim to the headband and legs.

Shirt and headband
I used a very small double folded blind hem on the headband. The elastic is actually an ear loop from a surgical mask cut it in half. Since we all have plenty of those in these strange times, one might as well make the best of it. They are easy to stitch on, and soft enough to pull through a button hole.
As you can see in the picture, I used a minimum of 2 mm seam allowance for the shirt. I usually sew stuff that tiny by hand, you might need to add a bit of allowance if you use a machine. Front- and back neckline are cut deeper than the pattern pieces in this example. Neck and sleeves have a rolled hem, the bottom is finished with a tiny zigzag, folded up and top stitched. I prefer to pull shirts up over the butt instead of closing them in the back, and I am not a fan of the diagonal grain, that’s why I didn’t draft it as a one-piece pattern shirt. There’s no hard and fast rule, just try different ways and figure out what method suits your needs best.

I hope this was fun and one of your dolls will have a cute overall soon :). Don’t forget to subscribe, the next patterns will be for a coat followed by a dress and leggings. You can find all patterns I share in the sewing section of the blog.
And maybe you’d like to join the Facebook group I created a couple of days ago to show how it turned out?
Tag @resinrapture on your Instagram or join the sewing and creating Facebook group OneSixBackstage to show your work!
I very much hope the group will grow into a nice community of creative doll owners. Sales-free and for all those of you who sew and create for Blythe, Pullip, Momoko, Kurhn or other 1/6 scale fashion dolls. A lot of them can share clothes and the same patterns work for a lot of different dolls. Let’s figure it out together!
Here is the link to the Blythe&co sewing and creating group “OneSixBackstage” on Facebook.

Oh my, this is adorable!!! I will definitely be doing it!
Thank you for sharing <3
Thank you! It might fit your Kanon – I am not sure how tall she is, but she should be close in size.
Another great pattern Mia! I do still have a couple of Blythe dolls and a Kurhn, so maybe I will give this a go down the track. I think Coco looks just as adorable in lilac, so perhaps you can convince her that she will enjoy the change from wearing pink. 😊
Big hugs,
X
Thank you! I think all light colors suit her, but I will have to make more outfits for her to see what else she likes.
Oh, this is so cute! I also love the denim one with the lace. Coco looks lovely in these colours, she’s such a cutie. 🙂
Thank you! And they are really fun and quick to make.
This turned out so cute. I made 2 long ones an 1 short one. I also widened it at the bottom ad made a romper.
Sounds like you had fun 🙂
Such a cute addition to the wardrobe of my Monst dolls. Thank you
You have not tried if it fits Monst, but it might if you shorten the legs a bit.
Comments are closed.