Skip to content

Three sewing secrets – ruffle, zipper, sleeves

Well, not secrets, but things I wish I had done like this right from the start. But I learned how to do it and it has made the life of a doll seamstress a bit easier. That’s why I decided to share these little tricks. I am sure there are different ways to do this, but this is how it works best for me.

I am going to show you an easy way to 1. ruffle a skirt, 2. set a zipper and .. 3. set sleeves.

Sounds boring, but I have seen a lot of very complicated, fiddly ways to do this, so this might help some of you after all.

I highly recommend getting three things for this: nylon coil zippers, a lighter and some transparent sewing thread for basting. This will require some hand sewing as well as a sewing machine (basic presser foot).

I use to buy close end zippers-lots in just white or mixed colors in lengths between 14-16 cm (something around 6- 7 inches). The length works best for MSD sized dresses. You can get them on ebay in all sizes and colors. Same for transparent sewing thread. I couldn’t do without. It’s great for basting. It doesn’t split, so there’s no danger of sewing into the thread. You can easily pull it out again and re-use it, It makes sewing in that scale just so much more accurate than just using pins.

Let’s get started.

Ruffling or gathering a skirt

This example shows how to make a gathered skirt. You have your dress top finished, and want to add a gathered skirt. I use to make the skirt- width approximately twice the length of the waist line. Unless your fabric is very thin more makes the skirt bulky at the waist.
You want to hem your fabric first. I use to zigzag once around the complete rectangle. Doing this for all parts separately has the advantage that you can part the sewing allowance and press your seams better, which reduces the amount of bulk considerably.
 
After that you chose basic sewing stitch and the largest possible stitch length. Sew at the waistline and don’t lock your stitch.
 
Make sure the bobbin thread is long enough to grab and hold it at the ends. Only use good quality yarn to avoid torn threads.
Now you pin the middle of your top to the middle of your skirt. Grab the bobbin thread, hold it and push the fabric up to the pin in the middle. It’ll slide on the thread into gathers. The pin is just a help to make the ruffle look the same on both sides, and pinning end to end might help as well. 

Once you have your gathers pushed the way you want it, pin them down to the top. As shown in picture 3 you might want to pin the ends vertically to avoid uneven endings. Use zigzag to fixate the ruffle and a basic stitch to sew the parts together.

If your ruffle-thread shows on the front you might want to try to pull it out completely. 

Turn your dress and add a top stitch. I use to leave one thread long to attach the zipper later and clean up the rest.

Setting the zipper

Now you need the lighter and the transparent thread.
Cut your zipper as shown in the very first picture above the stopper and run the lighter flame along the cut to melt the fiber of the zipper fabric. I use this method a lot to prevent fraying.
 
Ribbons, zippers, anything made from non-natural fiber. Just melt it, don’t hold it into the flame, else it will blacken. A quick run along the fabric cut is usually enough. Try the distance with the cut off ends first if you are unsure. 

(1) Baste the seam allowance back and pin the left top corner to the zipper. (2) I use to open it a bit for the first pin and close it again for the rest. 

(3) Baste the left side to the zipper. Start to sew the left dress half to the zipper with a top stitch, starting a bit above the end piece (4). 

Once the left side is attached, I close the zipper and pin the waist at the same position (5). That’s the part where the leftover long thread comes in handy, I usually sew just the waist seam to the zipper with a few stitches to get them positioned exactly even (6). 

Now I pin and baste the right dress part, sew it to the zipper and turn the insides out. (7).

I close the gap by hand and sew about an inch down to continue with the sewing machine without getting the zipper ends in the way. That way the zipper end coil is hidden (8).

All done, except hemming the dress skirt at the bottom.


Setting sleeves

Guessing from the questions I’ve been asked I figured I needed to rephrase this part, so this is the second attempt to explain it since I published the post. I also added a new picture.

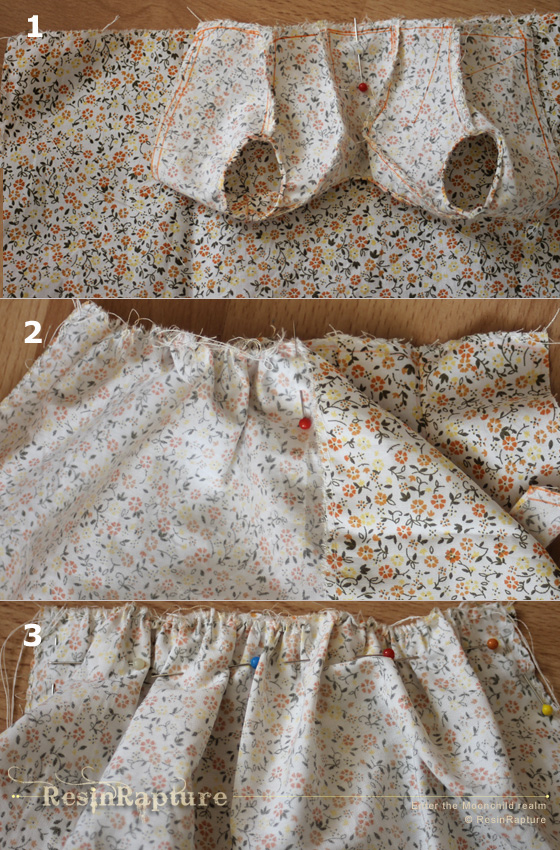
Working in this scale is different from human clothes, so the method of sewing the armhole first on the flattened garment and finishing the sides after is sometimes quite fiddly.

Doing it by hand and using this method might be an easier way to go about it, especially if you use stretchy fabric that doesn’t need a hem. 

It’s just a very simple method for inset sleeves, and for doll clothes I don’t mind the hand sewing or adding a hem by hand. Sleeve and bodice are sewn separately first and the sleeve is attached to the armhole after.

To attach the sleeve make sure your sleeve is pulled to the right side. Don’t laugh, I managed to forget this a couple of times and attached the sleeve inside out. The body of your garment on the other hand should stay inside out. It’s easier with jackets, and even easier if you leave one thread of the sleeve seam long to attach the sleeve seam aligned with the side seam of your bodice.
 
Mark the middle of the sleeve on the shoulder part. I use to cut sleeves in a way that create an oval with a pointy top to mark the middle of it. Pin the seam line to the side seam line of your bodice and the shoulder seam to the middle of the sleeve. Baste edge to edge, sew along and done. 
 
Trying to describe the process was much more complicated than actually doing it ;).

One thing that’s generally very helpful to reduce bulk, especially if you sew very tiny garments: Press your seams. As you can see in this picture, the edges are separated and flattened to both sides. Running a zigzag stitch along all parts first makes it possible.

I hope this was helpful. And @Balljointedwoman, I hope this helps to overcome your dislike of zippers 😉

11 thoughts on “Three sewing secrets – ruffle, zipper, sleeves”

  1. Thanks for the helpful hints. Working both sides of the ruffle towards the middle sounds like an easy way to distribute the gathers evenly. I usually pin from the ends, but then I have a hard time getting the same amount of ruffle on each side.

    So, what exactly are you melting on the zipper? The coil? Or the cut end of zipper fabric? Or both? My problem with zippers is how to keep the zipper pull from continuing up past the end of the coil when it gets to the top of the dress. It sounds as if melting the coil itself should help in that regard.

    I'm eager to try your sleeve method. I always work flat and then sew up the sleeves and sides in one continuous seam. I don't mind hand-sewing, so your method of sewing in the round might work better for me. Do you sew up the sides of the garment and then the sleeves separately before you join them?

  2. Thank's for asking, I hope I changed the sentence into a more precise one. I just melt the zipper fabric. Really just a quick touch to the heat. Same with satin ribbons. Just to prevent fraying. The zippers I use are not continuous, so they have a stopper at the end and don't slide up. That's why it didn't even occur to me that might be a problem. But with those a drop of nail polish or hot glue on the coil should do the trick.

    As for the sleeves: Yes, I make sleeves and sides seperately. If the sleeves need to be shortened or there's something else I want to change I don't need to unpick all seams, just the one connecting it to the armhole. And if I already attached buttons or lacetrim I like to shorten sleeves by setting them up, not by redoing the end after cutting them. I only use your method with larger doll's clothes with fabric that needs a hem, and with human clothes. I'd love to know how that works for you.

  3. I got tired of the bobbin thread breaking on me. Now I zigzag over a stronger thread and draw it up that way. Pull out the thread later if it's too bulky.

    Also, put a pin in the very middle before drawing up and use that to match the skirt middle to the bodice middle.

  4. If I ever manage to tear myself away from my crochet projects, I'll try the sleeves your way. My next project isn't even clothing. I'm making a cloth dragon.

  5. A dragon! Sounds great. A while ago Martha made one, a pretty huge one even. I thought about making one when I saw it, but I guess you want one as beast for your incoming beauty, right?

  6. This is a great tutorial, thank you so much for sharing it! I liked how you explained the sleeves and the zipper. I always have such a hard time dealing with zippers, honestly!

  7. I find you get a much neater gathering if you sew 2 parallel basting lines about 1/4 inch apart. (Same width as if you used a double needle) Pull up the gathering threads the same as you would with one. But, this method gives you a nice little channel to stitch in with very neat ruffling.

  8. Thank you for showing me a new way to set a sleeve. I have struggled with these little doll sleeves. Your way makes so much sense.

Comments are closed.