I know, I told some people I wouldn’t add new patterns, because I was a bit miffed to see that I had a couple more downloads than people who followed the few rules I asked to accept, and I saw some dresses on etsy that had a very familiar cut. But hey, that’s the internet, I guess. I’ll get over it ;).
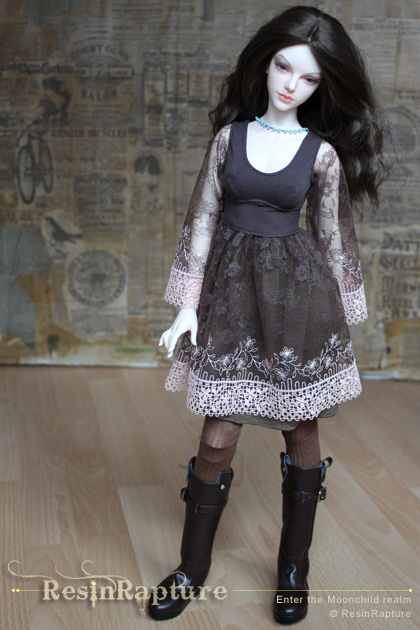
As promised, here’s a short ‘how to’ for Tabea’s lace baby doll dress. I chose to close it with one button attached to the waistband. The skirt is open at the back, but since the ruffles are overlapping it doesn’t matter. It’s super easy to put on this way.
I ordered my lace from a Chinese seller on ebay called anitashu11, but if you don’t want to wait I am sure you find something nice at laceplace or a similar shop. And it doesn’t need to be lace, of course, it just looks fancier.

Pattern-Iplehouse-nYID-top-bustier-babydoll
I made this pattern for a bra and just changed it a bit. Of course you can use it for a different type of skirt and use a zipper, that’s why I left the edges at the back of the bust-part.
What you need: stretchy fabric (medium jersey), a hook or press button (or two, if you go for the two button version). Lace or some other nice fabric of approx 15 cm width and about 50 cm length plus 30 cm for the sleeves. The thinner the material the more you can use without risking a too crumpled ruffle. You don’t necessarily need a sewing machine (the top is all hand-sewn), but it makes the ruffling easier.
- Print out pattern using A4 paper size. With most browsers, you can get something like “send to printer” in the right-click context menu. If you don’t get that right away, select File ->Print.
- I used medium jersey, if the fabric is too thin it’ll be too stretchy. This very transparent lace needs an underskirt, but if you pick something not quite so transparent you can skip that.
- Cut out your pieces. Don’t forget to add seam allowance and the right grain direction.
- Sew shoulders first. The neckline is a rolled hem. Try the dart size you need first, if you have a glamour busted girl you might need to add a bit more seam allowance or lengthen the shoulder straps.
Larger breast = wider dart. - Once you’ve sewn the darts, add the waistband, starting in the middle. The overlapping ends are used to attach the button later. Add top stitch if you like.
- For the sleeves you need about 15 cm fabric each. I double-folded the ends and made an overlapping seam to prevent tearing. I just pinned it into the arm hole with a slight angle until it looked right and attached it like that.
- Top done? Great. Now the ruffle. It’s easier with a sewing machine. Just sew along the top of you skirt-lace with the largest normal stitch and DON’T lock the stitch. Now you can just hold the bobbin thread on both ends and push the fabric into a ruffle until you have reduced the length to fit the waistband. If you want to leave the back open, I suggest you make a double-folded hem first.
- Stitch skirt to top. I usually add a top stitch on the front to make it look even and flatten it down.
All done :). If you need an underskirt, less fabric will do, else the seam in the waist looks a bit padded. Have fun!