Today we are going to have fun with craft foam board. I have made a template you can use to create your own 1:6 armchair. Take the time to read through the tutorial, but don’t let the amount of text discourage you. Making the chair is actually a pretty easy job.
Materials needed:
- Glue, cutter or scalpel, ruler and pencil or ball pen, pins and tape. If you don’t have a cutting ruler, a small picture frame glass will do the job. Felt, fleece or any other padding material you want to use. Fabric for your cover.
- DIN A4 foam board in 5mm thickness, make sure it’s paper laminated on both sides. That would be letter sized and 3/16 inch thickness for the non-metric folks. I ordered my foam board for this project from Amazon, (Cathedral A4 foam board). 20 sheets for 14€. I am sure there is something similar available in every country. Not the best quality, but absolutely sufficient for this chair project.
- Square wooden dowels for the legs. I used 1 x1 cm width, and cut them into 3cm long pieces. You can get them in your local hardware store or model making online stores. Even from Amazon, I believe, they are sold as cake support rods. You can use something else of course, just make sure to adjust the cut-outs for the leg support.
Pick your template size. You will find the link to the template PDFs at the bottom of this post.
Make sure you print it without automatic scaling at 100%. Unfortunately every printer has a margin, and I had to keep that in mind. If you want to get the most out of your foam board, start at the board edges (and cut your printout accordingly). Make sure the boards have exact right angles before you rely on that. Even if they are machine cut, the angles are sometimes a bit out of square. I tried to arrange the pieces in a way that would allow you to cut without a lot of waste, but you will still have some left overs. Keep them, they are great to make tiny books :-).
Note for the letter template: I couldn’t fit the second side part (number 7) on the page, you will need to cut that twice. And you will need more foam board than the two sheets.
How to make the armchair?
Place the printout on the foam board and pin it or tape it to keep it from moving. Use a pencil or ball pen to trace all outlines. Press only gently, else you will poke a hole into your board. The surface of the board is soft enough to create an indentation of the shapes, and you can draw proper lines using the dents afterwards. No measuring needed. Once you have transferred all outlines, cut your pieces. I find it easier to cut straight into the material in a standing position because the angle is different, but of course that’s up to you. The cheap foam board is not very dense, so there will be a bit of crumbling and uneven edges.


Chose which side of the side parts you want to face outward, and draw a line for the legs on the inside. Glue the back panel part A (2) between the side parts (1). You can easily pin into the material to keep the parts in position until the glue is dry. I prefer Ponal wood glue over hot glue, but you probably have your own sticky favorite.
While that dries, glue your leg support (6) to the back panel part B (3). Make sure the bottoms are aligned and the cut-outs face down. Same goes for the leg support on the foot rest/front panel (4).
Glue your back part B (3) below the back part A and the front panel at the front between the side parts. If you want to make sure the angle is right, you can use your seat cut to keep the position in addition to pins, but don’t glue it in yet. The legs come first. Glue your legs in, using the line and your cut-outs to help with the position. You’ll want to take the pins out first to be able to lay the chair flat on it’s sides.
Once your basic frame is dry and stable, glue your seat in. It rests on the seat support on the back panel B and your front panel (4). Last come the parts you can use to make wider arm rests (7). If your side panels and the additional parts are a bit crumbly and don’t align exactly, you can use tape to cover the edges. It doesn’t hurt to tape all edges to add stability.
After this you can start padding your construction. I used white fleece. I found fiber easier to pull over the arm rest than packing foam sheets for example, but I used those for the flat parts.


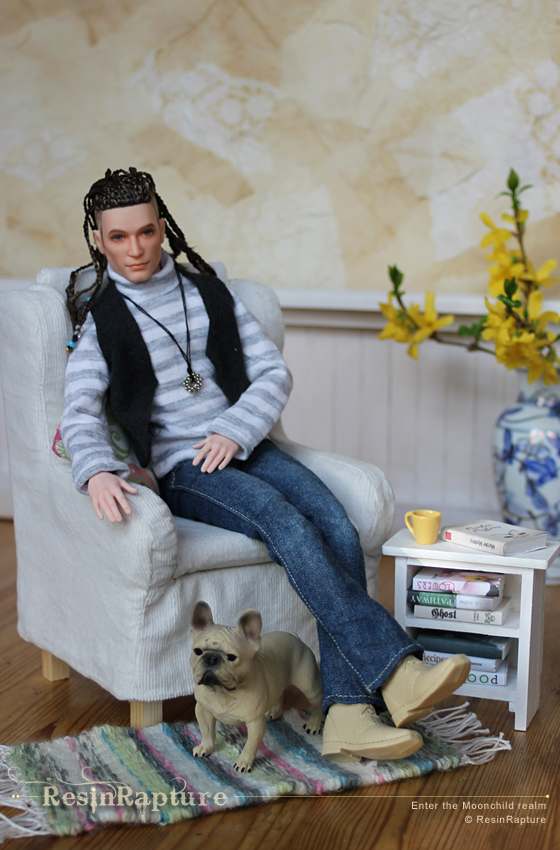
If you only want this chair for Barbie or action figures (or any other 1:6 dolls with a small head), you can probably reduce the width of the chair, but if you want to use it for Blythe, you’ll want the head to fit between the wings, that’s why I made it a bit wider. You can see in the picture above how the chair looks without any additional padding.
I will add a separate seat and back rest on top of the basic cover, but the fabric cover pattern fits over a thin layer of padding.
I want to be able to take the cover off and wash it or change it, that’s why I prefer to sew it. And I don’t want to spoil the whole chair with a fabric glue mishap. But if you don’t want to take the trouble of sewing, you can look on Youtube for upholstery-videos, there are a lot of different techniques and ways to find your individual solution. This one for example shows how to make a DIY dollhouse armchair. Bentley house minis is a dollhouse miniature DIY channel, and certainly worth a look.
A glued on cover has the advantage of looking like a tight and exact fit compared to the throw cover look of a sewn cover. The disadvantage is that you can get glue where you don’t want it, and mistakes are not easy to fix.
Sewing the cover
Print the cover template and cut your pieces. Add sewing allowance! If you want to use fabric with a pattern, make sure the pattern points in the direction you want it to.
I used corduroy and only pinked the edges.
Attach the stripes at the top to the back part. Pin inner and outer side cover together, align the curved part. As you can see, the outer side cover is wider than the inner cover.
Either baste the parts together or leave the pins in. Connecting the stripes to both parts evenly is easier while they are still aligned.


Fold the stripe at the lose end and insert the fold between the side covers to attach the end. Connect with a few stitches to keep in place. Make tiny cuts into the sewing allowance where the curves are. Align the edges of sides and stripe, pin and baste them down when you are satisfied the sides are evenly connected to the stripe.


I prefer sewing fiddly parts like this by hand. I used the machine to sew the straight parts. You will have your own preferred method.
Don’t close the seam that connects the sides to the back panel all the way down right from the start. Depending on the stretch you will need to test how far you can close it to be able to pull the cover over the arm rests. My corduroy cover fits just fine completely closed, but the material has a tiny bit of stretch to it. Iron your seams. It will look nicer and less crumply if you do.
Once your basic cover is finished, you can make your additional padding. My separate seat and back rest padding are two pieces of foam board with a double layer of fleece glued to it. I added a template and pattern to the PDF. These dolls are so light that they hardly make a dent into thick and soft foam padding, so you might as well just go for a less soft version and add cushions for a comfy look. I closed the covers at the bottom like I would close a gift wrap and stitched it down. And the hard foam base can be used to keep the cover in place.
Use your left overs to make some nice books. Your dolls will enjoy a good book and a cup of coffee in their new armchair.

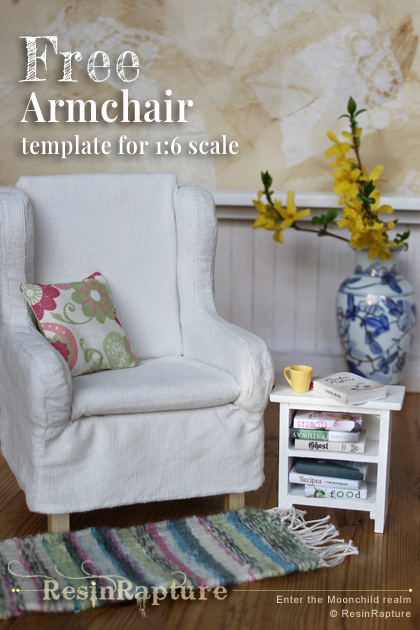
And now the finished armchair in action 🙂


Chose your template size
Letter / DIN A4 PDF
Don’t forget to subscribe to the blog if you want to use it!
![]()
![]()
Thank you Mia for sharing this! I will try to make the chair, if I can pull it off my professor will be very happy with it. 🙂 It looks really great!
You are welcome. I am absolutely certain you can pull it off. Just sewing the cover is a bit fiddly, but I know you are able to make stuff like that.
This is fabulous Mia, thank you! I’ll be sharing your blog post too, so hopefully you’ll get some new readers. 🙂
Thank you :). I don’t know if you plan to make one, but if you do I look forward to see it.
It looks great. I will definitely try to make one. Thank you so much!
Thank you! I look forward to see your’s 🙂
Comments are closed.